It should come as no surprise to anyone that has played board games with me that one of my all time favorite board games is Agricola, and today I'm going to give you a rough introduction to the game. Hopefully this will give players who have never played a rough idea of what is involved in the game, while also outlining the general strategies you should consider when dipping your toes into the game, or returning to it after a long hiatus.
In Agricola you play as a farmer living in a wooden shack with your spouse, and throughout the game your goal is to grow your farm by plowing fields to sow grain and vegetables, building fences and stables to breed animals, building extra rooms onto your house, and growing your family. It's a worker placement game, which means every turn you will get to place your family members (you start out with two) on spaces of a central board to collect resources like wood, clay, stone, and reed; or to perform other actions like sowing a field or renovating your home. Only one worker is allowed on each space during a given turn, and since it's a shared board, you'll be competing with other players for the best spaces each turn. At the end of each turn everyone takes their workers back and a new action becomes available on the board, generally more powerful than the ones that preceded it. At the end of certain turns, there will be a harvest.
During harvest turns, players will be able to reap the rewards of their labor. Grain and Vegetables that have been planted on your fields will come off, and if you have a pair of animals they will breed. However, during the harvest you must also feed each member of your family two food. For every food you cannot pay, you are forced to go begging, which gives you a permanent -3 Victory Points during final scoring. At the end of the game, you will receive points based on how well you have managed to develop your farm and house. Players can earn points in everything from the number of sheep they have to the amount of fields plowed. Unused spaces on your farm count against you, so you want to make sure you fill up as much space as possible!
When crafting a strategy for Agricola, it's important to look at what you are working towards. Agricola can be a deceptive game because it tends to reward diversity more than specialization. Once you have acquired four vegetables, you've capped the amount of points you can have in that category. Additionally, not participating in a category also deducts points from your overall score. This is an important distinction, since picking up just a single cattle will net you 2 points (taking you from -1 to +1). As such, late in the game, it's often preferable to make sure you have a little bit of everything, rather than a surplus of one particular thing. For the rest of this article I'm going to go over some of the general strategies you will employ in Agricola to get these Victory Points. I'll be going over some of the rules lightly as I've done above, so if you're unfamiliar with the game, I suggest taking a look at the full Agricola Rules so you don't get too lost.
Crop Farming (12)
Crop Farming includes the points from Fields, Grain, and Vegetables, and while it generally doesn't net as many points as other categories, the Fields will take up precious space on your farm to reduce the penalty you take from unused spaces at the end of the game. The grain and vegetables can also be eaten raw as food, or cooked into more food using the Fireplace or Ovens found in the Major Improvements.
The first thing you need to farm is to Plow a Field, which can be done at the "Plow a Field" space which is available from the beginning of the game. Next you need to acquire your crops. Grain is available from an action space at the beginning of the game and the Vegetable action space becomes available on either Round 8 or 9 (since there are only 14 rounds in the game, you will have to move quickly to acquire and plant vegetables). The final step of the process is probably the most confusing, and that's sowing. When you sow, you count up the number of empty fields you have in your farm, and for each one you can place either a grain or a vegetable on top of that. You then take two grain from the general supply for every grain you planted, and one vegetable for every vegetable you planted, and place them on top of the planted crop on the field. These new grain and vegetables are now planted, and at the beginning of every harvest, you'll get the topmost one off the stack. This effectively triples your grain and doubles your vegetable in terms of victory points, since planted & harvested crops both count for victory points! The fields will eventually become empty again, after three harvests for grain and two for vegetables, so knowing how to cycle your crops and when to plant them again will be key to worker management.
Sowing can be performed on two spaces. The first is the "Sow and/or Bake Bread" space, which is available starting between Rounds 1 and 4, before the first harvest. "Bake Bread" allows you to turn Grain into food if you have an Improvement that lets you do that, like the Fireplace. The second space is the "Plow a Field and/or Sow," which allows you to plow an extra field before you sow. This space doesn't show up until the final three turns of the game, and will be highly contested as many players will be looking to maximize their points in farming during the end of the game.
Livestock Farming (20)
Livestock Farming includes the points from the three types of animals you can raise, Sheep, Wild Boar, and Cattle, as well as the points attainable from pastures and fenced stables. Raising animals is a bit more difficult and time intensive than planting fields, but has a higher ceiling as far as points go. To begin you must first build a habitat for the animals you plan on raising. There are two options for this. Stables can be built at the "Build Rooms and/or Stables" space available from the beginning of the game, and cost 2 wood a piece. Each stable can house exactly one animal, and you are limited to four stables per game. The second option is pastures, which require you to fence in a portion of your farmland at a cost of one wood per section of fence. This is done at the "Fences" action space available starting between Rounds 1 and 4.
When you begin building fences you must fully enclose a pasture, so deciding how much space you will need, and therefore how much wood you need, will be something you want to consider when planning your worker placement. A single space of land needs only four wood, a 1x2 rectangle requires six wood, and a 2x2 square requires 8 wood. Whether it's 1x1, 2x2, or 3x3, each closed off area counts as a single pasture, and can only contain one type of animal (Sheep cannot mix with Cattle of Wild Boar). However, each section of farmland you enclose can hold two animals. So a 2x2 pasture can hold 8 Sheep for 8 wood, where a 1x1 pasture can only hold 2 Sheep for 4 wood. If you manage to fence in a stable, the stable doubles the holding capacity of your pasture, meaning the 1x1 pasture would then be able to hold 4 animals, and the 2x2 could hold 16! Of course, even with 8 Sheep you've already reached the maximum points you can attain for that animal, so extra copies are redundant unless you plan on cooking them for food, which you can with the Fireplace or Cooking Hearth.
The animals will become available on spaces in certain rounds: Sheep starting between rounds 1 and 4, Wild Board starting either round 8 or 9, and Cattle starting either round 10 or 11. In a 5-player game there is also a space where you can get animals directly from the start of the game, easing the crunch to acquire Cattle or Boar before game's end. Part of the difficulty in Livestock farming is that it requires lots of Wood, which is a heavily sought out resource, not only for fences and stables, but also for building rooms and the costs for minor improvements. Another problem is that players can take a buildup of animals they can't house and simply convert them into food immediately if they have the means. Each player can also keep one of each animal in their house, so if a player builds a large pasture it is very easy for another player to pick up a large buildup of Sheep or Boar to counter the Livestock Farmer. There are several Occupations and Minor Improvements that can remedy these weaknesses, by giving you extra animals, easing the wood cost of building stables and fences, and even giving you extra food during harvests where you have a good number of animals.
House & Family (19+)*
Your House and Family include the possible fifteen points available from having five family members *(since all players start with two family members, you can only gain nine points) and the points available from extending and renovating your house, which generally tops at about ten for a five room stone house. Your house can be one of three types: the Wood Shack that you start with, a Clay Hut that your shack can be renovated to, and a Stone House which is renovated from that. Each renovation costs one Reed plus one Clay or Stone (depending on what you are renovating into) per room in your house, so to renovate your two-room wood shack to clay would require two Clay and one Reed. Each room in a Clay hut gives you one point, and each room in a Stone house grants two points. Renovations can be done on two spaces: The "Renovate + Major/Minor Improvement" space available starting between rounds 5 and 7, and the "After Renovation, Also Fences" space available only on the last turn of the game.
Adding Rooms is only available on the "Build Rooms and/or Stables" space available from the start of the game. Each room you build costs 2 Reed + 5 of whatever resource your house currently is. Each extra room you build not only increases the points you get when you renovate your house, but can also support another family member. Between rounds 5 and 7, the "Family Growth, then Minor Improvement" space becomes available, which players that have unused rooms in their house can use to grow their family. In a five-player game, there is an "Occupation or from Round 5 on Family Growth" space available from the start of the game. There is also a "Family Growth, even without room" space that becomes available on turn 12 or 13, which does not require you to have an extra room to house the new family member.
Growing your family early is extremely beneficial, as the new family member can also take actions. The downside is that you now have to pay two more food every harvest to feed the extra person, but since the person can usually be played on spaces that just give you food, like "Fishing" or "Day Laborer," he will often be able to pay for himself. Because growing your family cannot happen before turn five, many player will try to set up to grow their family by building a room before the first harvest, to ensure if the "Family Growth" action comes up on turn 5, or if they are just playing in a 5-player game and can grow from turn 5 anyways, that they will be able to use it.
Improvements & Occupations
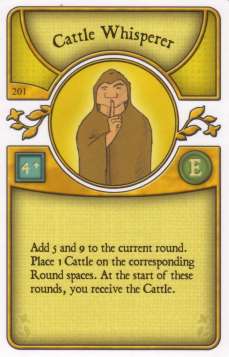
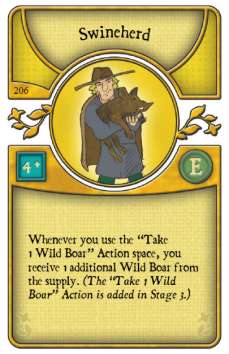
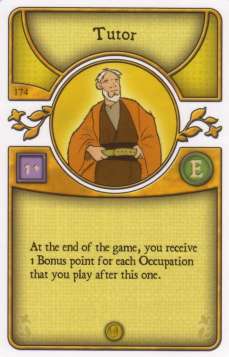
The final category is a supplementary category, but an important one. While I've mentioned these above, I haven't gone into great detail about them. Minor Improvements and Occupations are cards that you receive seven of each at the beginning of the game. Occupations can be played from the start of the game, occasionally at the cost of one or two food. Occupations can have immediate effects, like the Cattle Whisperer, which places Cattle on future round spaces that you get at the start of those rounds. Some have constant effects on the game, such as the Swineherd, which enhances the ability of the "Wild Boar" action space. And some, like the Tutor, will grant you bonus points at the end of the game.
Minor Improvements are similar to Occupations in that they will give you an immediate or constant bonus, but unlike Occupations, each Improvement has a particular cost to play. Prerequisites are located in the upper-left corner: so for the Writing Desk you need to have played two Occupations in order to play it. The cost of the Improvement is in the upper-right corner: again, for the Writing Desk, you have to pay one Wood in order to play the Writing Desk. Some Minor Occupations will also have a small gold circle in the lower-left corner of the card art. This represents the amount of Victory Points the card is worth at the end of the game. Major Improvements are similar to Minor Improvements, but each Major Improvement is available to all players at the beginning of the game. These include cards that give you some way of converting animals, crops, or resources into food. The "Minor/Major Improvement" space that becomes available starting between rounds 1 and 4 the first early space where you can play Major Improvements. Other spaces available throughout the game will allow you to play Improvements in addition to other effects, such as the "Family Growth & Minor Improvement" and "Starting Player & Minor Improvement" action spaces. Making sure you have the resources and prerequisites to play an Improvement when you go to these spaces requires planning and precision, and will be key when you are trying to eke out every last point you can.
That covers the very basics of Agricola. If you're not very familiar with this game, hopefully between this introduction and the rules you have a good idea of what you can and should be doing throughout the game to earn victory points. Next week I'll focus more on the actual gameplay, particularly on the early game so that you can survive the first harvest and set up your strategy for the rest of the game.
Occupation & Improvement Card Images from Play-Agricola.
Boardgamegeek images shared under Creative Commons License
In Agricola you play as a farmer living in a wooden shack with your spouse, and throughout the game your goal is to grow your farm by plowing fields to sow grain and vegetables, building fences and stables to breed animals, building extra rooms onto your house, and growing your family. It's a worker placement game, which means every turn you will get to place your family members (you start out with two) on spaces of a central board to collect resources like wood, clay, stone, and reed; or to perform other actions like sowing a field or renovating your home. Only one worker is allowed on each space during a given turn, and since it's a shared board, you'll be competing with other players for the best spaces each turn. At the end of each turn everyone takes their workers back and a new action becomes available on the board, generally more powerful than the ones that preceded it. At the end of certain turns, there will be a harvest.
 |
| Cattle in Pastures from Arne Hoffmann |
When crafting a strategy for Agricola, it's important to look at what you are working towards. Agricola can be a deceptive game because it tends to reward diversity more than specialization. Once you have acquired four vegetables, you've capped the amount of points you can have in that category. Additionally, not participating in a category also deducts points from your overall score. This is an important distinction, since picking up just a single cattle will net you 2 points (taking you from -1 to +1). As such, late in the game, it's often preferable to make sure you have a little bit of everything, rather than a surplus of one particular thing. For the rest of this article I'm going to go over some of the general strategies you will employ in Agricola to get these Victory Points. I'll be going over some of the rules lightly as I've done above, so if you're unfamiliar with the game, I suggest taking a look at the full Agricola Rules so you don't get too lost.
Crop Farming (12)
Crop Farming includes the points from Fields, Grain, and Vegetables, and while it generally doesn't net as many points as other categories, the Fields will take up precious space on your farm to reduce the penalty you take from unused spaces at the end of the game. The grain and vegetables can also be eaten raw as food, or cooked into more food using the Fireplace or Ovens found in the Major Improvements.
 |
| The Hand Mill is an improvement that allows you to convert grain to food without having to bake bread. |
Sowing can be performed on two spaces. The first is the "Sow and/or Bake Bread" space, which is available starting between Rounds 1 and 4, before the first harvest. "Bake Bread" allows you to turn Grain into food if you have an Improvement that lets you do that, like the Fireplace. The second space is the "Plow a Field and/or Sow," which allows you to plow an extra field before you sow. This space doesn't show up until the final three turns of the game, and will be highly contested as many players will be looking to maximize their points in farming during the end of the game.
Livestock Farming (20)
Livestock Farming includes the points from the three types of animals you can raise, Sheep, Wild Boar, and Cattle, as well as the points attainable from pastures and fenced stables. Raising animals is a bit more difficult and time intensive than planting fields, but has a higher ceiling as far as points go. To begin you must first build a habitat for the animals you plan on raising. There are two options for this. Stables can be built at the "Build Rooms and/or Stables" space available from the beginning of the game, and cost 2 wood a piece. Each stable can house exactly one animal, and you are limited to four stables per game. The second option is pastures, which require you to fence in a portion of your farmland at a cost of one wood per section of fence. This is done at the "Fences" action space available starting between Rounds 1 and 4.
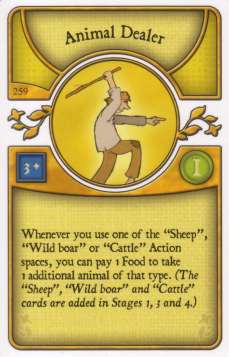 |
| The Animal Dealer can ensure you get a pair of animals, even on spaces with only one animal available. |
The animals will become available on spaces in certain rounds: Sheep starting between rounds 1 and 4, Wild Board starting either round 8 or 9, and Cattle starting either round 10 or 11. In a 5-player game there is also a space where you can get animals directly from the start of the game, easing the crunch to acquire Cattle or Boar before game's end. Part of the difficulty in Livestock farming is that it requires lots of Wood, which is a heavily sought out resource, not only for fences and stables, but also for building rooms and the costs for minor improvements. Another problem is that players can take a buildup of animals they can't house and simply convert them into food immediately if they have the means. Each player can also keep one of each animal in their house, so if a player builds a large pasture it is very easy for another player to pick up a large buildup of Sheep or Boar to counter the Livestock Farmer. There are several Occupations and Minor Improvements that can remedy these weaknesses, by giving you extra animals, easing the wood cost of building stables and fences, and even giving you extra food during harvests where you have a good number of animals.
House & Family (19+)*
Your House and Family include the possible fifteen points available from having five family members *(since all players start with two family members, you can only gain nine points) and the points available from extending and renovating your house, which generally tops at about ten for a five room stone house. Your house can be one of three types: the Wood Shack that you start with, a Clay Hut that your shack can be renovated to, and a Stone House which is renovated from that. Each renovation costs one Reed plus one Clay or Stone (depending on what you are renovating into) per room in your house, so to renovate your two-room wood shack to clay would require two Clay and one Reed. Each room in a Clay hut gives you one point, and each room in a Stone house grants two points. Renovations can be done on two spaces: The "Renovate + Major/Minor Improvement" space available starting between rounds 5 and 7, and the "After Renovation, Also Fences" space available only on the last turn of the game.
 |
| End of Game Board from Greg Udvari |
Growing your family early is extremely beneficial, as the new family member can also take actions. The downside is that you now have to pay two more food every harvest to feed the extra person, but since the person can usually be played on spaces that just give you food, like "Fishing" or "Day Laborer," he will often be able to pay for himself. Because growing your family cannot happen before turn five, many player will try to set up to grow their family by building a room before the first harvest, to ensure if the "Family Growth" action comes up on turn 5, or if they are just playing in a 5-player game and can grow from turn 5 anyways, that they will be able to use it.
Improvements & Occupations
 |
| When is a raven like a writing desk? It isn't. Now get back to farming! |
Minor Improvements are similar to Occupations in that they will give you an immediate or constant bonus, but unlike Occupations, each Improvement has a particular cost to play. Prerequisites are located in the upper-left corner: so for the Writing Desk you need to have played two Occupations in order to play it. The cost of the Improvement is in the upper-right corner: again, for the Writing Desk, you have to pay one Wood in order to play the Writing Desk. Some Minor Occupations will also have a small gold circle in the lower-left corner of the card art. This represents the amount of Victory Points the card is worth at the end of the game. Major Improvements are similar to Minor Improvements, but each Major Improvement is available to all players at the beginning of the game. These include cards that give you some way of converting animals, crops, or resources into food. The "Minor/Major Improvement" space that becomes available starting between rounds 1 and 4 the first early space where you can play Major Improvements. Other spaces available throughout the game will allow you to play Improvements in addition to other effects, such as the "Family Growth & Minor Improvement" and "Starting Player & Minor Improvement" action spaces. Making sure you have the resources and prerequisites to play an Improvement when you go to these spaces requires planning and precision, and will be key when you are trying to eke out every last point you can.
That covers the very basics of Agricola. If you're not very familiar with this game, hopefully between this introduction and the rules you have a good idea of what you can and should be doing throughout the game to earn victory points. Next week I'll focus more on the actual gameplay, particularly on the early game so that you can survive the first harvest and set up your strategy for the rest of the game.
Occupation & Improvement Card Images from Play-Agricola.
Boardgamegeek images shared under Creative Commons License
No comments:
Post a Comment