Your primary goal for the First Harvest should be to acquire four Food. With the exception of a few Occupations and Improvements, you cannot grow your family before round 5, which means you'll need a total of 4 Food. Though you start with some food to facilitate spaces like Occupation, one of the decisions you have to make early on is how you plan to make up that deficit over the first four turns. You have two main options, either gather the food directly from Action Spaces or find a way to generate food. Finding a way to generate food from baking grain into bread or converting animals into food will make future harvests easier, as you won't be competing for the limited amount of food available on the board.
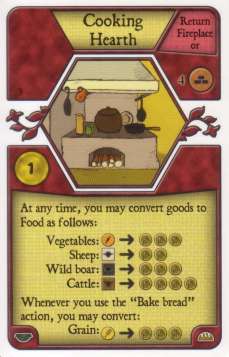
 Food can be acquired directly on two spaces: Day Laborer, which immediately grants you two Food; and Fishing, which accumulates one food on it at the start of every turn until someone uses that space. In games with four or more players the Traveling Players space becomes available, which acts like Fishing in that it accumulates one food each turn. Food can also be generated from the Fireplace and Cooking Hearth Improvements, which can be used to convert Sheep, Boar, Cattle, Grain, and Vegetables into multiple food. These are Major Improvements that can be built using only Major/Minor Improvement during the first four rounds. The cost for these improvements vary, ranging anywhere from two Clay for the cheapest Fireplace to five Clay for the most expensive Cooking Hearth. These Improvements are first-come-first-serve, and there are only two of each, which means in a 5-Player Game, one person will be forced to generate food without one (this isn't as bad as it sounds, but the Fireplace/CH are very convenient since they convert just about everything short of your building materials into food).
Your two starting family members mean you will get a total of eight actions, and unless you plan on going Begging after round 4 (something I strongly advise against), these spaces should probably be incorporated into your plan to ensure you survive the first harvest. Luckily, with your starting food you will likely only have to use one of your eight plays during the first round for this, which gives you some leeway for the other factors you may want to prepare for. After getting your food on lockdown, there are three secondary goals you should focus on getting by the time the harvest rolls around which will help set you up for the rest of the game. These goals are:
Food can be acquired directly on two spaces: Day Laborer, which immediately grants you two Food; and Fishing, which accumulates one food on it at the start of every turn until someone uses that space. In games with four or more players the Traveling Players space becomes available, which acts like Fishing in that it accumulates one food each turn. Food can also be generated from the Fireplace and Cooking Hearth Improvements, which can be used to convert Sheep, Boar, Cattle, Grain, and Vegetables into multiple food. These are Major Improvements that can be built using only Major/Minor Improvement during the first four rounds. The cost for these improvements vary, ranging anywhere from two Clay for the cheapest Fireplace to five Clay for the most expensive Cooking Hearth. These Improvements are first-come-first-serve, and there are only two of each, which means in a 5-Player Game, one person will be forced to generate food without one (this isn't as bad as it sounds, but the Fireplace/CH are very convenient since they convert just about everything short of your building materials into food).
Your two starting family members mean you will get a total of eight actions, and unless you plan on going Begging after round 4 (something I strongly advise against), these spaces should probably be incorporated into your plan to ensure you survive the first harvest. Luckily, with your starting food you will likely only have to use one of your eight plays during the first round for this, which gives you some leeway for the other factors you may want to prepare for. After getting your food on lockdown, there are three secondary goals you should focus on getting by the time the harvest rolls around which will help set you up for the rest of the game. These goals are:
- Having Grain planted on a field.
- Having two animals in your farm, with room for a third.
- Building an extra room in your house.
The reasons for the first two goals are self-explanatory if you look at the steps involved in a harvest. The first thing that happens in a harvest is each player receives crops from their planted fields. Sowing grain on your field before the first harvest will mean you will get your grain back, plus two more grain during the next harvests. It will also free up your field earlier for you to plant again. To do this on the first turn normally requires a minimum or three spaces: Plow a Field, Take a Grain, and Sow and/or Bake Bread. This is generally the safest of the three sub-goals to complete, since the grain that you get from the field counts as a food itself, meaning you only need 3 more food going into the harvest as opposed to four.
The second goal involves the final step of the harvest: breeding animals. After you have fed your people, this phase grants you a free animal of any type of animal you have at least one pair of, so this would allow you to get a third Sheep if you have two. Having space for three animals among your farm requires either a 1x1 pasture or two stables, either of which will cost you a total of four Wood. The pasture provides space for two sheep, and the third can be kept in your house as a pet. Similarly, the stables provide space for one animal of each type, with the third being in your house. Obviously the larger the pasture you can make, the more animals you can hold, but wood is such a hotly contested resource in the early game that you may not get the ability to take as much as you would like. Depending on the number of players you play with, this can require a good bit of timing with the accumulating action spaces, but it can also be done in three spaces: Wood (4+), Build Fences or Build a Room and/or Stables, and Sheep (2).
This plan is significantly riskier for a few reasons. The first is that it requires you to time the accumulating action spaces very well. When any accumulating resource space has four of more on it, it becomes very tempting for the other players. The Sheep action space can also be hotly contested in the early game since anyone with a Fireplace/CH can take all the sheep and turn them immediately into food, even without room on their farm (Note that this is something you cannot do with newborn animals). It also carries with it the added risk that the Sheep space has a 25% chance of showing up in Round 4, meaning it won't have a chance to accumulate enough sheep in time for the first harvest. In a five-player game, there is a space that allows you to Take an Animal on it, either a Sheep & one food, a Wild Boar, or paying one food for a Cattle. While this means the breeding step prep now requires four actions overall, it allows you to safely acquire two sheep while also effectively netting you two food, which is the same as a Sheep (2) & Day Laborer allocation. The other complication is that you need a Fireplace/CH to turn the Sheep into food, so if something does go wrong in food calculation you won't have the option of eating the Grain raw as you would in the first option.
The final plan hinges less on the harvest and more on the Stage 2 Family Growth action. The earliest this space can show up is Round 5, and in a five-player game one space can be used as a Family Growth action beginning in Round 5. These are hotly contested spaces, though they come with the stipulation of you having room in your home for the newborn in order to go there. Building the extra room before the first harvest will give you strategic positioning on this space, particularly if you are the only person who has an extra room, as you can use your last person to grow your family while using your first person to take other contested spaces. This path also can be done in three spaces: Reed (2), Wood (5), and Build a Room and/or Stables.
While this plan won't net you free animals or grain, having extra people to place will give you extra actions during the game. Many times you can just use the person to Take a Grain or Sheep during worker placement. Extra workers do cost more food every harvest, but going to Day Laborer or Fishing, spots that tend to be less contested later in the game, will often just pay for any extra food that person would cost you in the harvest. Family members are also worth 3VP at the end of the game, so growing your house and family will also net you a good chunk of points at the end of the game, in addition to allowing you to take more actions.
One final goal you may want to shoot for is building a Fireplace/CH before the harvest, which will likely take two spaces: Clay (2+) and Major/Minor Improvement. This is a decent addition to any starting strategy since Clay tends to be less contested early on than other resources, though getting an early Fireplace will give you a good cushion in the first and subsequent harvest in terms of ways to get food (remember, animal spaces essentially become huge Food spaces).
Lets put it all together to see what your first eight actions might look like focusing on these goals, with a little luck:
In this scenario, you'll enter the first harvest with a planted field and a three room wooden house, giving you position to grow your family in round 5 if the Family Growth action space comes up. This plan is somewhat ambitious as it requires some good timing to snag the Reed space while it has two resources on it, but other scenarios could replace steps 3 & 8 with Clay (2) and Major/Minor for a Fireplace, or Fences and Sheep (2) for a pasture and breeding phase. This scenario also ignores cards you have in your hand that you may want to play early, which may heavily influence your play. As such, all of the plays are what I would refer to as "on-board," meaning they are reliant not on your personal collection of cards, but competing "on the board" for community resources, which is something I will go over in my next article.
Hope you enjoyed, and are ready to tackle your first four turns in Agricola!
While this plan won't net you free animals or grain, having extra people to place will give you extra actions during the game. Many times you can just use the person to Take a Grain or Sheep during worker placement. Extra workers do cost more food every harvest, but going to Day Laborer or Fishing, spots that tend to be less contested later in the game, will often just pay for any extra food that person would cost you in the harvest. Family members are also worth 3VP at the end of the game, so growing your house and family will also net you a good chunk of points at the end of the game, in addition to allowing you to take more actions.
One final goal you may want to shoot for is building a Fireplace/CH before the harvest, which will likely take two spaces: Clay (2+) and Major/Minor Improvement. This is a decent addition to any starting strategy since Clay tends to be less contested early on than other resources, though getting an early Fireplace will give you a good cushion in the first and subsequent harvest in terms of ways to get food (remember, animal spaces essentially become huge Food spaces).
Lets put it all together to see what your first eight actions might look like focusing on these goals, with a little luck:
- Wood (3)
- Take a Grain
- Reed (2)
- Plow a Field
- Wood (3)
- Day Laborer/Fishing
- Sow and/or Bake Bread
- Build Rooms and/or Stables
In this scenario, you'll enter the first harvest with a planted field and a three room wooden house, giving you position to grow your family in round 5 if the Family Growth action space comes up. This plan is somewhat ambitious as it requires some good timing to snag the Reed space while it has two resources on it, but other scenarios could replace steps 3 & 8 with Clay (2) and Major/Minor for a Fireplace, or Fences and Sheep (2) for a pasture and breeding phase. This scenario also ignores cards you have in your hand that you may want to play early, which may heavily influence your play. As such, all of the plays are what I would refer to as "on-board," meaning they are reliant not on your personal collection of cards, but competing "on the board" for community resources, which is something I will go over in my next article.
Hope you enjoyed, and are ready to tackle your first four turns in Agricola!
*Parentheses after an action designates an accumulating resource space that has that many resources. "Sheep (2)" refers to the accumulating "Sheep" Action Space that has at least 2 Sheep on it.
No comments:
Post a Comment