Showing posts with label Board Games. Show all posts

Monday, November 3, 2014

Surviving the First Harvest

Your primary goal for the First Harvest should be to acquire four Food.  With the exception of a few Occupations and Improvements, you cannot grow your family before round 5, which means you'll need a total of 4 Food.  Though you start with some food to facilitate spaces like Occupation, one of the decisions you have to make early on is how you plan to make up that deficit over the first four turns.  You have two main options, either gather the food directly from Action Spaces or find a way to generate food.  Finding a way to generate food from baking grain into bread or converting animals into food will make future harvests easier, as you won't be competing for the limited amount of food available on the board.

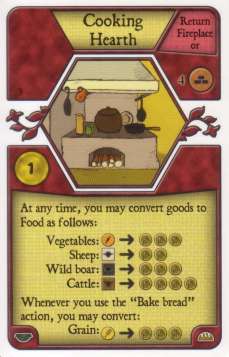
Food can be acquired directly on two spaces: Day Laborer, which immediately grants you two Food; and Fishing, which accumulates one food on it at the start of every turn until someone uses that space.  In games with four or more players the Traveling Players space becomes available, which acts like Fishing in that it accumulates one food each turn.  Food can also be generated from the Fireplace and Cooking Hearth Improvements, which can be used to convert Sheep, Boar, Cattle, Grain, and Vegetables into multiple food.  These are Major Improvements that can be built using only Major/Minor Improvement during the first four rounds.  The cost for these improvements vary, ranging anywhere from two Clay for the cheapest Fireplace to five Clay for the most expensive Cooking Hearth.  These Improvements are first-come-first-serve, and there are only two of each, which means in a 5-Player Game, one person will be forced to generate food without one (this isn't as bad as it sounds, but the Fireplace/CH are very convenient since they convert just about everything short of your building materials into food).

Your two starting family members mean you will get a total of eight actions, and unless you plan on going Begging after round 4 (something I strongly advise against), these spaces should probably be incorporated into your plan to ensure you survive the first harvest.  Luckily, with your starting food you will likely only have to use one of your eight plays during the first round for this, which gives you some leeway for the other factors you may want to prepare for.  After getting your food on lockdown, there are three secondary goals you should focus on getting by the time the harvest rolls around which will help set you up for the rest of the game.  These goals are:
  • Having Grain planted on a field.
  • Having two animals in your farm, with room for a third.
  • Building an extra room in your house.
The reasons for the first two goals are self-explanatory if you look at the steps involved in a harvest.  The first thing that happens in a harvest is each player receives crops from their planted fields.  Sowing grain on your field before the first harvest will mean you will get your grain back, plus two more grain during the next harvests.  It will also free up your field earlier for you to plant again.  To do this on the first turn normally requires a minimum or three spaces: Plow a Field, Take a Grain, and Sow and/or Bake Bread.  This is generally the safest of the three sub-goals to complete, since the grain that you get from the field counts as a food itself, meaning you only need 3 more food going into the harvest as opposed to four.

The second goal involves the final step of the harvest: breeding animals.  After you have fed your people, this phase grants you a free animal of any type of animal you have at least one pair of, so this would allow you to get a third Sheep if you have two.  Having space for three animals among your farm requires either a 1x1 pasture or two stables, either of which will cost you a total of four Wood.  The pasture provides space for two sheep, and the third can be kept in your house as a pet.  Similarly, the stables provide space for one animal of each type, with the third being in your house.  Obviously the larger the pasture you can make, the more animals you can hold, but wood is such a hotly contested resource in the early game that you may not get the ability to take as much as you would like.  Depending on the number of players you play with, this can require a good bit of timing with the accumulating action spaces, but it can also be done in three spaces: Wood (4+), Build Fences or Build a Room and/or Stables, and Sheep (2).  

This plan is significantly riskier for a few reasons.  The first is that it requires you to time the accumulating action spaces very well.  When any accumulating resource space has four of more on it, it becomes very tempting for the other players.  The Sheep action space can also be hotly contested in the early game since anyone with a Fireplace/CH can take all the sheep and turn them immediately into food, even without room on their farm (Note that this is something you cannot do with newborn animals).  It also carries with it the added risk that the Sheep space has a 25% chance of showing up in Round 4, meaning it won't have a chance to accumulate enough sheep in time for the first harvest.  In a five-player game, there is a space that allows you to Take an Animal on it, either a Sheep & one food, a Wild Boar, or paying one food for a Cattle.  While this means the breeding step prep now requires four actions overall, it allows you to safely acquire two sheep while also effectively netting you two food, which is the same as a Sheep (2) & Day Laborer allocation.  The other complication is that you need a Fireplace/CH to turn the Sheep into food, so if something does go wrong in food calculation you won't have the option of eating the Grain raw as you would in the first option.

The final plan hinges less on the harvest and more on the Stage 2 Family Growth action.  The earliest this space can show up is Round 5, and in a five-player game one space can be used as a Family Growth action beginning in Round 5.  These are hotly contested spaces, though they come with the stipulation of you having room in your home for the newborn in order to go there.  Building the extra room before the first harvest will give you strategic positioning on this space, particularly if you are the only person who has an extra room, as you can use your last person to grow your family while using your first person to take other contested spaces.  This path also can be done in three spaces: Reed (2), Wood (5), and Build a Room and/or Stables.   

While this plan won't net you free animals or grain, having extra people to place will give you extra actions during the game.  Many times you can just use the person to Take a Grain or Sheep during worker placement.  Extra workers do cost more food every harvest, but going to Day Laborer or Fishing, spots that tend to be less contested later in the game, will often just pay for any extra food that person would cost you in the harvest.  Family members are also worth 3VP at the end of the game, so growing your house and family will also net you a good chunk of points at the end of the game, in addition to allowing you to take more actions.

One final goal you may want to shoot for is building a Fireplace/CH before the harvest, which will likely take two spaces: Clay (2+) and Major/Minor Improvement.  This is a decent addition to any starting strategy since Clay tends to be less contested early on than other resources, though getting an early Fireplace will give you a good cushion in the first and subsequent harvest in terms of ways to get food (remember, animal spaces essentially become huge Food spaces).

Lets put it all together to see what your first eight actions might look like focusing on these goals, with a little luck:

  1. Wood (3)
  2. Take a Grain
  3. Reed (2)
  4. Plow a Field
  5. Wood (3)
  6. Day Laborer/Fishing
  7. Sow and/or Bake Bread
  8. Build Rooms and/or Stables

In this scenario, you'll enter the first harvest with a planted field and a three room wooden house, giving you position to grow your family in round 5 if the Family Growth action space comes up.  This plan is somewhat ambitious as it requires some good timing to snag the Reed space while it has two resources on it, but other scenarios could replace steps 3 & 8 with Clay (2) and Major/Minor for a Fireplace, or Fences and Sheep (2) for a pasture and breeding phase.  This scenario also ignores cards you have in your hand that you may want to play early, which may heavily influence your play.  As such, all of the plays are what I would refer to as "on-board," meaning they are reliant not on your personal collection of cards, but competing "on the board" for community resources, which is something I will go over in my next article.

Hope you enjoyed, and are ready to tackle your first four turns in Agricola!

*Parentheses after an action designates an accumulating resource space that has that many resources.  "Sheep (2)" refers to the accumulating "Sheep" Action Space that has at least 2 Sheep on it.

Monday, October 6, 2014

Introduction to Subsistence Agriculture

It should come as no surprise to anyone that has played board games with me that one of my all time favorite board games is Agricola, and today I'm going to give you a rough introduction to the game.  Hopefully this will give players who have never played a rough idea of what is involved in the game, while also outlining the general strategies you should consider when dipping your toes into the game, or returning to it after a long hiatus.

In Agricola you play as a farmer living in a wooden shack with your spouse, and throughout the game your goal is to grow your farm by plowing fields to sow grain and vegetables, building fences and stables to breed animals, building extra rooms onto your house, and growing your family.  It's a worker placement game, which means every turn you will get to place your family members (you start out with two) on spaces of a central board to collect resources like wood, clay, stone, and reed; or to perform other actions like sowing a field or renovating your home.  Only one worker is allowed on each space during a given turn, and since it's a shared board, you'll be competing with other players for the best spaces each turn.  At the end of each turn everyone takes their workers back and a new action becomes available on the board, generally more powerful than the ones that preceded it.  At the end of certain turns, there will be a harvest. 

Cattle in Pastures from Arne Hoffmann
During harvest turns, players will be able to reap the rewards of their labor.  Grain and Vegetables that have been planted on your fields will come off, and if you have a pair of animals they will breed.  However, during the harvest you must also feed each member of your family two food.  For every food you cannot pay, you are forced to go begging, which gives you a permanent -3 Victory Points during final scoring.  At the end of the game, you will receive points based on how well you have managed to develop your farm and house.  Players can earn points in everything from the number of sheep they have to the amount of fields plowed.  Unused spaces on your farm count against you, so you want to make sure you fill up as much space as possible!

When crafting a strategy for Agricola, it's important to look at what you are working towards.  Agricola can be a deceptive game because it tends to reward diversity more than specialization.  Once you have acquired four vegetables, you've capped the amount of points you can have in that category.  Additionally, not participating in a category also deducts points from your overall score.  This is an important distinction, since picking up just a single cattle will net you 2 points (taking you from -1 to +1).  As such, late in the game, it's often preferable to make sure you have a little bit of everything, rather than a surplus of one particular thing.  For the rest of this article I'm going to go over some of the general strategies you will employ in Agricola to get these Victory Points.  I'll be going over some of the rules lightly as I've done above, so if you're unfamiliar with the game, I suggest taking a look at the full Agricola Rules so you don't get too lost.

Crop Farming (12)
Crop Farming includes the points from Fields, Grain, and Vegetables, and while it generally doesn't net as many points as other categories, the Fields will take up precious space on your farm to reduce the penalty you take from unused spaces at the end of the game.  The grain and vegetables can also be eaten raw as food, or cooked into more food using the Fireplace or Ovens found in the Major Improvements.

The Hand Mill is an improvement that
allows you to convert grain to food
without having to bake bread.
The first thing you need to farm is to Plow a Field, which can be done at the "Plow a Field" space which is available from the beginning of the game.  Next you need to acquire your crops.  Grain is available from an action space at the beginning of the game and the Vegetable action space becomes available on either Round 8 or 9 (since there are only 14 rounds in the game, you will have to move quickly to acquire and plant vegetables).  The final step of the process is probably the most confusing, and that's sowing.  When you sow, you count up the number of empty fields you have in your farm, and for each one you can place either a grain or a vegetable on top of that.  You then take two grain from the general supply for every grain you planted, and one vegetable for every vegetable you planted, and place them on top of the planted crop on the field.  These new grain and vegetables are now planted, and at the beginning of every harvest, you'll get the topmost one off the stack.  This effectively triples your grain and doubles your vegetable in terms of victory points, since planted & harvested crops both count for victory points!  The fields will eventually become empty again, after three harvests for grain and two for vegetables, so knowing how to cycle your crops and when to plant them again will be key to worker management.


Sowing can be performed on two spaces.  The first is the "Sow and/or Bake Bread" space, which is available starting between Rounds 1 and 4, before the first harvest.  "Bake Bread" allows you to turn Grain into food if you have an Improvement that lets you do that, like the Fireplace.   The second space is the "Plow a Field and/or Sow," which allows you to plow an extra field before you sow.  This space doesn't show up until the final three turns of the game, and will be highly contested as many players will be looking to maximize their points in farming during the end of the game.

Livestock Farming (20)
Livestock Farming includes the points from the three types of animals you can raise, Sheep, Wild Boar, and Cattle, as well as the points attainable from pastures and fenced stables.  Raising animals is a bit more difficult and time intensive than planting fields, but has a higher ceiling as far as points go.  To begin you must first build a habitat for the animals you plan on raising.  There are two options for this.  Stables can be built at the "Build Rooms and/or Stables" space available from the beginning of the game, and cost 2 wood a piece.  Each stable can house exactly one animal, and you are limited to four stables per game.  The second option is pastures, which require you to fence in a portion of your farmland at a cost of one wood per section of fence.  This is done at the "Fences" action space available starting between Rounds 1 and 4.  

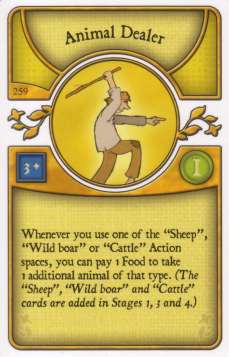
The Animal Dealer can ensure you
get a pair of animals, even on spaces
with only one animal available.  
When you begin building fences you must fully enclose a pasture, so deciding how much space you will need, and therefore how much wood you need, will be something you want to consider when planning your worker placement.  A single space of land needs only four wood, a 1x2 rectangle requires six wood, and a 2x2 square requires 8 wood.  Whether it's 1x1, 2x2, or 3x3, each closed off area counts as a single pasture, and can only contain one type of animal (Sheep cannot mix with Cattle of Wild Boar).  However, each section of farmland you enclose can hold two animals.  So a 2x2 pasture can hold 8 Sheep for 8 wood, where a 1x1 pasture can only hold 2 Sheep for 4 wood.  If you manage to fence in a stable, the stable doubles the holding capacity of your pasture, meaning the 1x1 pasture would then be able to hold 4 animals, and the 2x2 could hold 16!  Of course, even with 8 Sheep you've already reached the maximum points you can attain for that animal, so extra copies are redundant unless you plan on cooking them for food, which you can with the Fireplace or Cooking Hearth.

The animals will become available on spaces in certain rounds: Sheep starting between rounds 1 and 4, Wild Board starting either round 8 or 9, and Cattle starting either round 10 or 11.  In a 5-player game there is also a space where you can get animals directly from the start of the game, easing the crunch to acquire Cattle or Boar before game's end.  Part of the difficulty in Livestock farming is that it requires lots of Wood, which is a heavily sought out resource, not only for fences and stables, but also for building rooms and the costs for minor improvements.  Another problem is that players can take a buildup of animals they can't house and simply convert them into food immediately if they have the means.  Each player can also keep one of each animal in their house, so if a player builds a large pasture it is very easy for another player to pick up a large buildup of Sheep or Boar to counter the Livestock Farmer.  There are several Occupations and Minor Improvements that can remedy these weaknesses, by giving you extra animals, easing the wood cost of building stables and fences, and even giving you extra food during harvests where you have a good number of animals.

House & Family (19+)*
Your House and Family include the possible fifteen points available from having five family members *(since all players start with two family members, you can only gain nine points) and the points available from extending and renovating your house, which generally tops at about ten for a five room stone house.  Your house can be one of three types: the Wood Shack that you start with, a Clay Hut that your shack can be renovated to, and a Stone House which is renovated from that.  Each renovation costs one Reed plus one Clay or Stone (depending on what you are renovating into) per room in your house, so to renovate your two-room wood shack to clay would require two Clay and one Reed.  Each room in a Clay hut gives you one point, and each room in a Stone house grants two points.  Renovations can be done on two spaces: The "Renovate + Major/Minor Improvement" space available starting between rounds 5 and 7, and the "After Renovation, Also Fences" space available only on the last turn of the game.

End of Game Board from Greg Udvari
Adding Rooms is only available on the "Build Rooms and/or Stables" space available from the start of the game.  Each room you build costs 2 Reed + 5 of whatever resource your house currently is.  Each extra room you build not only increases the points you get when you renovate your house, but can also support another family member.  Between rounds 5 and 7, the "Family Growth, then Minor Improvement" space becomes available, which players that have unused rooms in their house can use to grow their family.  In a five-player game, there is an "Occupation or from Round 5 on Family Growth" space available from the start of the game.  There is also a "Family Growth, even without room" space that becomes available on turn 12 or 13, which does not require you to have an extra room to house the new family member.


Growing your family early is extremely beneficial, as the new family member can also take actions.  The downside is that you now have to pay two more food every harvest to feed the extra person, but since the person can usually be played on spaces that just give you food, like "Fishing" or "Day Laborer," he will often be able to pay for himself.  Because growing your family cannot happen before turn five, many player will try to set up to grow their family by building a room before the first harvest, to ensure if the "Family Growth" action comes up on turn 5, or if they are just playing in a 5-player game and can grow from turn 5 anyways, that they will be able to use it.

Improvements & Occupations
When is a raven like a writing desk?
It isn't.  Now get back to farming!
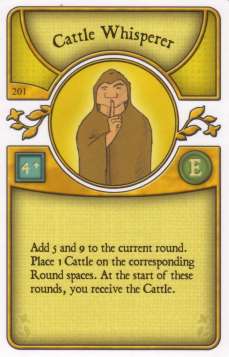
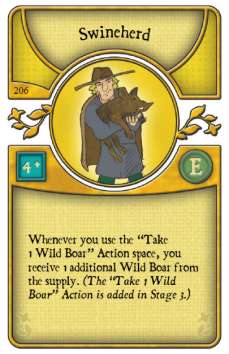
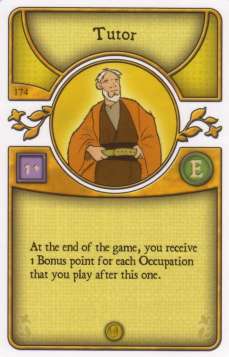
The final category is a supplementary category, but an important one.  While I've mentioned these above, I haven't gone into great detail about them.  Minor Improvements and Occupations are cards that you receive seven of each at the beginning of the game.  Occupations can be played from the start of the game, occasionally at the cost of one or two food.  Occupations can have immediate effects, like the Cattle Whisperer, which places Cattle on future round spaces that you get at the start of those rounds.  Some have constant effects on the game, such as the Swineherd, which enhances the ability of the "Wild Boar" action space.  And some, like the Tutor, will grant you bonus points at the end of the game.

Minor Improvements are similar to Occupations in that they will give you an immediate or constant bonus, but unlike Occupations, each Improvement has a particular cost to play.  Prerequisites are located in the upper-left corner: so for the Writing Desk you need to have played two Occupations in order to play it.  The cost of the Improvement is in the upper-right corner: again, for the Writing Desk, you have to pay one Wood in order to play the Writing Desk.  Some Minor Occupations will also have a small gold circle in the lower-left corner of the card art.  This represents the amount of Victory Points the card is worth at the end of the game.  Major Improvements are similar to Minor Improvements, but each Major Improvement is available to all players at the beginning of the game.  These include cards that give you some way of converting animals, crops, or resources into food.  The "Minor/Major Improvement" space that becomes available starting between rounds 1 and 4 the first early space where you can play Major Improvements.  Other spaces available throughout the game will allow you to play Improvements in addition to other effects, such as the "Family Growth & Minor Improvement" and "Starting Player & Minor Improvement" action spaces.  Making sure you have the resources and prerequisites to play an Improvement when you go to these spaces requires planning and precision, and will be key when you are trying to eke out every last point you can.

That covers the very basics of Agricola.  If you're not very familiar with this game, hopefully between this introduction and the rules you have a good idea of what you can and should be doing throughout the game to earn victory points.  Next week I'll focus more on the actual gameplay, particularly on the early game so that you can survive the first harvest and set up your strategy for the rest of the game.  

Occupation & Improvement Card Images from Play-Agricola.
Boardgamegeek images shared under Creative Commons License

Thursday, September 25, 2014

Diplomacy and Planet Trading

I'm not sure I've encountered a game that elicits as strong opinions as Twilight Imperium does, and not for lack of reasons.  One thing that anyone who plays the game will tell you is that's it's long, and that's putting it mildly.  Most five-player games of TI will take as many hours, if not more.  With that sort of time investment, players want to make sure they can justify the time investment, so you're more likely to care about whether you play with a particular rules variant in TI than you would in a shorter game, like Alhambra for example.  Another reason is that the game breeds conflict.  I mean, it's not a cooperative game like Arkham Horror, so you're competing against your fellow players, but it's also a war game, so the path to victory will be paved with you getting into direct competition with the other players, as opposed to a more passive competition for limited resources in a worker placement game like Agircola (though even Agricola has attack cards).  It's this second part I want to focus on here, because I think many opinions about Twilight Imperium stem from the strong opinions people have about war games, and particularly how the "domination" strategy receives unnecessary priority in a player's overall strategy. 

Twilight Imperium is not a World Domination Game, it is a Victory Point Game.  Yes, you can win by invading two other player's home planets, though I think in the near two dozen games of TI I've played I've seen this happen exactly once.  It is often much more efficient to focus on Victory Points, and generally you want to qualify for one of those Public Objectives at the end of each turn if you can, because outside of the person who receives the Bureaucracy Strategy, you only get to qualify for one every turn.  Many of those objectives you can plan for, such as "Spending 10 Influence," or ones that you can save for a turn when you don't qualify for any other objectives, like "having technology advances in all four colors"  Others objectives tend to reward conflict with other players, such as "I won a space battle against at least 2 opposing ships" or "I successfully invaded a planet that had at least one enemy ground force on it."  Objectives like these are ones that you should always select on a turn you qualify for them over something like "having x technology," since you will almost certainly still have those tech advances next turn, though you may not invade a planet or get into a space battle, even if you intend to.

I know several players have made the mistaken assumption that because there are cards that encourage fighting that fighting is inevitable for everyone, and while this is facilely true it doesn't always require you to be in conflict with everyone on the board.  Assume you and your neighbor both have poor, one-planet systems near your borders, each with a single ground force on it.  You notice your neighbor doesn't look poised to score any other victory points at the end of this turn, so you give him the option of "trading planets," while also ensuring that you'll each leave a single ground force on them to qualify for the "I successfully invaded a planet that had at least one enemy ground force on it."   While this strategy isn't as unilaterally beneficial as simply strong-arming your neighbor and taking the planet, it offers several advantages.  

For one, you are likely to lose less units in a concession like this than you are in forcing the victory point.  Everyone knows one of the ways to get a victory point is invading an enemy planet, so smart players will either bolster their border sectors with a compliment of ships or remove ground units from weaker planets entirely to dissuade their neighbor from completing the objective.  Coming to amicable agreements where you can avoid losing ships saves you from having to build future ships, ultimately gaining you resources other players might throw away.  Think about it: if you lose 6 resources worth of ships to take over a planet with Production 2, it takes 3 turns for you to recoup your losses, and that's assuming you can hold the damn thing.


Another benefit this has is it eliminates a reason for your opponent to invade you.  If they are focused on victory points (as they should be), and you've just let them fulfill one of the more aggressive ones, you've given him one less reason to attack in general.  This is largely dependent on your neighbor, as he may be the type who views TI as a straight up world domination game, or equates a glut colored plastic pieces with a casus belli.  Such players will likely find themselves spread too thin, with several unnecessary enemies and 3-4 VP shy of the leader by the late game, and while there's no guarantee you'll be next to some people that will be willing to make these deals, you should attempt to do this at any time with players who are willing: you lose less resources in obtaining that VP, you demonstrate to your neighbor that you can enact mutually beneficial agreements with them, and you eliminate an aggressive public objective from their list.

This sort of diplomacy is something that I believe benefits players in the long run.  It should come as no surprise that production value is extremely important in TI.  Early warfare tends to set most players back from the requisite fleet they need to actually make a move on Mecatol Rex, which will likely be a point of contention for at least a few players.  Keeping good border relations and not losing ships on frivolous wars over systems you can't defend are key to the early and mid game of TI, and will generally net you as much production value as a person who got a slightly better set up planet-wise, but engaged in more needless skirmishes.
  

I had planned on making this a bit of a longer article, but had to cut it short due to study time.  After this weekend the LSAT will be behind me, and I'll be able to dedicate more time to the blog and gaming articles.  There's a large patch for Hex coming out next week, Civilization Beyond Earth is less than a month away, and I have some other board game strategy articles in the works I'm excited to share.

Until next time.

Monday, September 1, 2014

Building Mechanics in Board Games

One of the first board games I was ever introduced to was Scrabble.  My mother, sister, and grandmother all played it from when I was just a baby, so when I was finally old enough to string letters together I was eager to play with them.  When I was initially learning the strategy, like using S-tiles to make a plural word and building off of it, my sole goal was to get as high a score as I possibly could.  Once I had acquired a few wins under my belt, my attitude towards the game changed from getting as high a score as I possibly could to playing unique words that hadn't been played before.  I would revel at getting the opportunity to play words I had just learned like "jaunt" or "bovine" on the field, usually prompting a skeptical look or even a challenge from my family.  Sure, playing "DRY" might get me a Triple-Word score and net me more points, but why not play "ERUDITE" instead?  It's a better word, and it opens the board up.  A habit we later developed was taking a picture of particularly impressive Scrabble boards at the end, usually when we spread out to every corner, or had some monster words serving as the central pillar of our board.

This is one of the qualities I believe makes a truly amazing game: a player's ability to enjoy that game regardless of whether they are winning or losing.  Your game could have the tightest rules, the best resource allocation, and cool meeples for worker placement to boot, but if I ever feel like I'm just a glorified spectator of someone else churning cubes into victory points, I'm going to lose interest.  I think most players share this view to some extent.  If you've ever played Magic: the Gathering, you'll know that being on the wrong end of a double mulligan or mana-flood is ten times more frustrating than losing a game where your deck still got to do what it was supposed to do, especially if it's close.

Cooperative building is one such a mechanic that gives me the ability to enjoy a game even if I'm losing. Scrabble is probably the first game many people are introduced to where cooperative building takes place, even on a very rudimentary level--it certainly was for me.  You and the other players are working with each other to build a shared board of letter tiles that influences future play.  Yes, there are points, and scoring, and a winner at the end, but the ability to feel as if you are contributing to the board and are influencing your opponent's plays by opening up a Triple-Letter Score or blocking the last U while the poor sap to your right has the Q stranded in his hand always gives you some feeling of investment, that what you do matters in the grand scheme of things.   

Cooperative building also the central mechanic (and often overlooked mechanic) of the popular "gateway" games Ticket to Ride and Settlers of Catan.  In each game you are trying to build something on a shared, central board: in Ticket to Ride you are building a US railroad and in Settlers of Catan you're building your own little roads and settlements.  Unlike in Scrabble however, your railroad and settlements are your own, and must coexist alongside those of your opponent.  As such, the prime space for realizing your grand railway system of mountainside city is limited, which can cause conflict with your neighbors!  Despite this, at the end of the game you can see an island or map of the continental US that you have left your mark on, and the merges together to form something new.

The other spin on cooperative building are games where what you are building is separated from the other players: your own personal building board.  There can still be shared space where you interact with your opponents, often for the limited resources required to build whatever unit will accrue you as many points as possible.  But often times, even if you lose by a few points, you can still look down at game's end to marvel at what you had managed to accomplish; whether you're building a farm, a railroad, or even your own nation!  Below are some of my personal favorite examples of games that incorporate these building mechanics.


Carcassonne is the quintessential Cooperative Building game.  Players take turns drawing tiles and attaching them to preexisting tiles to form a collective map of sorts.  In addition to tiles, players can place meeples on their tile that represent thieves if placed on a road, knights if placed in a city, monks if placed in a monastery, or farmers if laid down on a field (lazy farmers).  These meeples will score you points when the city or road is completed, or when the monastery is fully surrounded and return to you so that you can play them again; otherwise they will remain on that space until the end of the game with their value diminished (farmers aren't scored until the very end of the game... lazy, lazy farmers).  Carcassonne is great in this way, as it rewards the completion of roads and cities and monasteries, along with other types of buildings in the many expansions.  Even though players are competing and scoring points, they are also invested in growing the overall board.  There have been many games of Carcassonne I've played where your score became second to "how long can we make this road" or "how big can we make this city?"  It's also an incredibly enjoyable family game since the rules are very simple, and everyone can freely discuss where best to place a certain tile since there's never any hidden information.  Carcassonne supports two to five players.


Picture from Gary James on BoardGameGeek
Alhambra is a game where you use various types of currency to purchase building tiles that you must arrange as you acquire them into your own personal Alhambra complex.  There are three scoring phases where players that have the most of a certain type of building tile will receive points.  Additionally, there are walls on some tiles that will influence where you can place them, or if you can place them at all, since you must always be able to reach your starting tile, the fountain, from any other tile in your Alhambra.  There are numerous expansions for the game since its debut over a decade ago, the most recent of which introduces falcons that can be placed on spaces where four tiles meet if among those tiles are certain building types.  Alhambra is a game I have played multiple times where the score is generally very close, even up to the very end.  While there is a fair bit of randomness involved in what tiles and currency are up for grabs each turn, you're rarely shut out from buying a tile and adding to your Alhambra in the way you can be from Settlers of Catan, where a few bad dice rolls can set you far behind.  At the end you can smile with pride if you manage to collect five or a single type of Falcon (with the expansion), or if you manage to wall off your entire Alhambra at the end, as I did on one playthrough.  Though the game can support up to six players, I recommend it for three or four as the number of tiles is limited, so the more players you have means a more sparse Alhambra for everyone.


Ascension is unique in that each player starts with their own identical deck of ten cards, but will often end the game with wildly different ones.  Each turn you draw five cards which you will use to either purchase new, stronger cards to add to your deck or to defeat monsters that will occasionally appear alongside the purchasable cards.  As the game progresses and you add more cards to your deck, it will become more powerful, capable of defeating the strongest monsters that could appear.  The purchasable cards fall under one of four factions: The Enlightened, The Void, The Mechana, and The Lifebound.  Focusing on one or more of the factions will often give you an advantage as certain cards will create powerful combos with one another.  Burrower Mark II allows you to draw cards whenever you play another Mechana Construct, which requires you to focus on a single card type, while Avatar Golem rewards you for diversifying.  The game has a limited number of victory points which are acquired from defeating monsters and from certain card effects.  Once they are depleted, the game ends and players go back through their deck to count up the points they get from the cards they added to their deck.  They add the number of points from cards in their deck to the number of physical victory points and compare them to determine the winner.  Deckbuilding games are an entire subgenre of board games where you build your deck as you play, which combines the deckbuilding and strategy-crafting fun of Trading Card Games without the randomness of booster packs.  If you enjoy Ascension, also consider its predecessor Dominion, along with the relatively new space-themed Star Realms.  Ascension supports two to four players.


Picture from Chris Barnard on BoardGameGeek
Betrayal is a psuedo-cooperative horror-themed game where players explore a haunted house by drawing and placing tiles with different rooms on them and getting encounters, items, or omens as they do.  Because the tiles are drawn at random, and placed only after a player opens a door to an unexplored place, the layout of the house is completely different each time you play, as is the final twist at the end: one of your party will become the titular "betrayer," working against the rest of the party once a certain number of omens have been drawn.  Sometimes the betrayer is summoning demons from hell to kill the party members.  In other scenarios they are trying to reunite a mummy with his long dead bride.  In my personal favorite scenario, I Was a Teenage Lycanthrope, the betrayer turns into a werewolf and will attack the party, slowly turning them into werewolves to join your pack.  If you manage to turn them all before they can make enough silver bullets and put an end to your "alternative lifestyle," you all win and can hunt for new victims together (you're the Alpha, of course).  Win, Lose, or Howl, you get a cool story and a labyrinthine house to create as you play.  An excellent and relatively quick game for up to six players.  Also be sure to check out the Tabletop play-through of Betrayal as well.


In Caverna you play as the head of a dwarf family who lives in a small cave near a forest.  With just you and your spouse to start with, you can choose various actions for your dwarves that involve digging deeper into the cave, developing ore and ruby mines, and furnishing new rooms from the freshly carved stone.  Alternately you can chop down the trees in the forest, set up pastures for animals or plow fields for you to grow crops.  You can even use the ore that you mine to furnish weapons for yourself and go on adventures, bringing back whatever plunder you happen to come across.  While a winning strategy tends to involve a little of everything, the fact that you can specialize your strategy means you could be a Ruby King, Queen of the Harvest, or Master Shepherd across a number of different playthroughs.  The end of game scoring will often be overshadowed by the layout of the little home you made for yourself, or how many cattle you were able to "appropriate" from your adventures.  Caverna, and its sister game Agricola (which I will spare you from for the time being) are both excellent games for building your own personal little homestead.  Caverna can support up to seven players, making it the largest game of this list, though dependent on the length of time individual players take on their turn, you may prefer to play with less to cut down on the time between turns.

Hope you enjoy these games as much as I do.  Until next time...